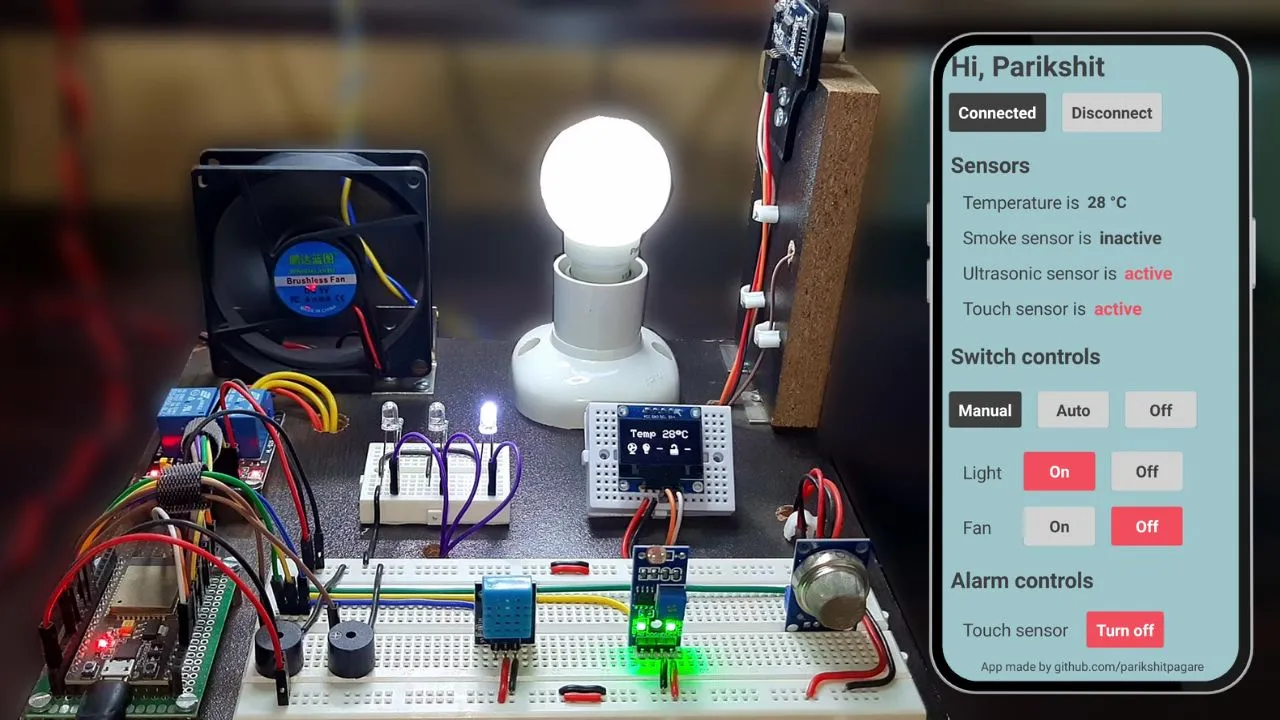
This Home Automation System allows you to control your household appliances (like lights, fans, etc.) remotely using your smartphone via Bluetooth. Built with Arduino, it's a practical and cost-effective way to introduce smart features into your living space, enhancing convenience and energy efficiency.
Components Used:
- Arduino Uno microcontroller board
- HC-05 Bluetooth Module (or HC-06)
- 1, 2, or 4-Channel Relay Module (depending on how many appliances you want to control)
- Smartphone with a compatible Android application (e.g., built with MIT App Inventor or a generic Bluetooth terminal app)
- AC appliances (lamps, fans, etc.) for demonstration (use caution with mains voltage)
- Jumper Wires
- Power supply for Arduino
How it Works:
The Arduino receives commands wirelessly from your smartphone via the HC-05 Bluetooth module. Based on the received commands (e.g., a character like 'A' for light on, 'a' for light off), the Arduino then triggers the appropriate relay. Relays act as electrically operated switches, safely controlling the higher voltage AC current flowing to your appliances.
Circuit Connections:
- HC-05 Bluetooth Module: `VCC` to Arduino 5V, `GND` to Arduino GND, `TX` to Arduino RX (pin 0), `RX` to Arduino TX (pin 1). (Note: For programming Arduino, disconnect TX/RX or use a software serial setup).
- Relay Module: `VCC` to Arduino 5V, `GND` to Arduino GND. `IN1`, `IN2`, etc., to Arduino Digital Pins (e.g., 2, 3, 4). Appliances connect to the relay's Normally Open (NO) and Common (COM) terminals.
Arduino Code Snippet (Simplified):
char command; // Variable to store incoming command

void setup() {
  Serial.begin(9600); // Initialize serial communication with Bluetooth module
  pinMode(2, OUTPUT); // Pin for Relay 1 (e.g., Light)
  pinMode(3, OUTPUT); // Pin for Relay 2 (e.g., Fan)
  // Set initial state (all off)
  digitalWrite(2, HIGH); // Relays are often active LOW
  digitalWrite(3, HIGH);
}

void loop() {
  if (Serial.available() > 0) { // Check if data is available from Bluetooth
    command = Serial.read();    // Read the incoming character

    switch (command) {
      case 'A': // Command to turn Light ON
        digitalWrite(2, LOW); // Activate Relay 1
        Serial.println("Light ON");
        break;
      case 'a': // Command to turn Light OFF
        digitalWrite(2, HIGH); // Deactivate Relay 1
        Serial.println("Light OFF");
        break;
      case 'B': // Command to turn Fan ON
        digitalWrite(3, LOW); // Activate Relay 2
        Serial.println("Fan ON");
        break;
      case 'b': // Command to turn Fan OFF
        digitalWrite(3, HIGH); // Deactivate Relay 2
        Serial.println("Fan OFF");
        break;
      default:
        // Optional: Handle unknown commands
        break;
    }
  }
}
Applications:
Beyond basic home appliance control, this project can be expanded into more complex smart home systems, integrating with other sensors (e.g., light sensors to turn on lights automatically), and even moving towards Wi-Fi based IoT solutions.